Android Studio ile Gmail Sliding Navigation Drawer Yapımı
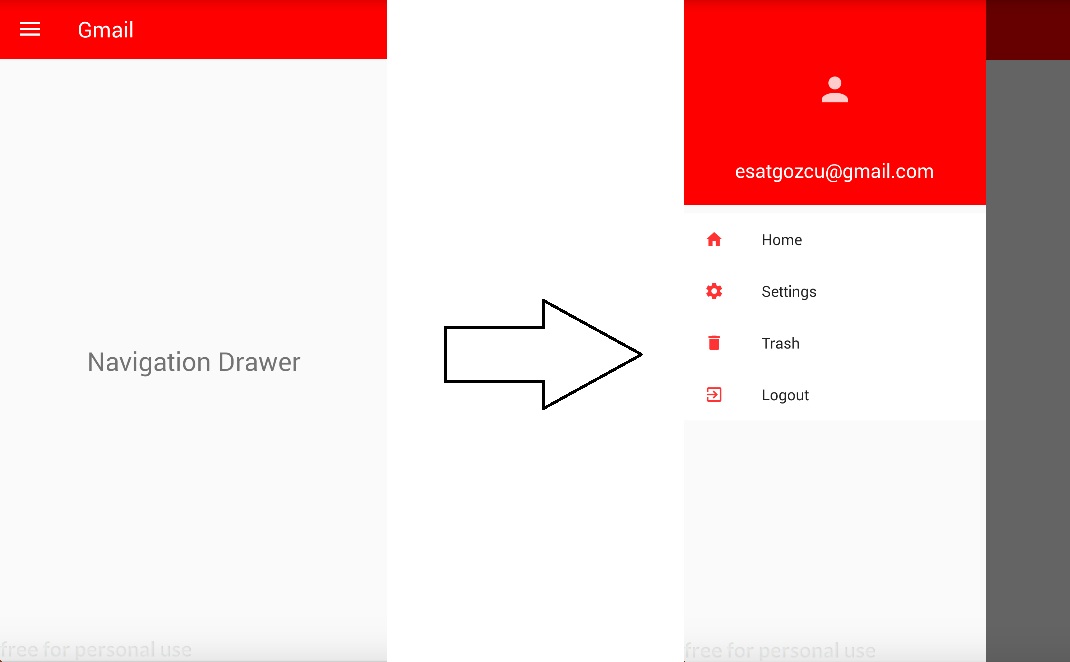
Gmail mobil uygulamasının yan tarafında bulunan gelen kutusu ve önemli yıldızlı gibi bölümleri olan sürüklenenerek veya sol üstte bulunan üç çizgili butona basınca ortaya çıkan navigasyon kısmını makalemizde nasıl yapabileceğimize bakacağız.

Öncelikle yapılması gereken ayarları yapalım.
build.gradle dosyamıza dizayn için kullanacağımız aşağıdaki kodu ekleyelim.
|
1 |
compile 'com.android.support:design:26.1.0' |
build.gradle dosyamızın son hali aşağıdaki gibi olması gerekiyor.
|
1 2 3 4 5 6 7 8 9 10 11 12 13 14 15 16 17 18 19 20 21 22 23 24 25 26 27 28 29 |
apply plugin: 'com.android.application' android { compileSdkVersion 26 defaultConfig { applicationId "com.example.esatgozcu.slidingnavigationdraweryapimi" minSdkVersion 15 targetSdkVersion 26 versionCode 1 versionName "1.0" testInstrumentationRunner "android.support.test.runner.AndroidJUnitRunner" } buildTypes { release { minifyEnabled false proguardFiles getDefaultProguardFile('proguard-android.txt'), 'proguard-rules.pro' } } } dependencies { implementation fileTree(dir: 'libs', include: ['*.jar']) implementation 'com.android.support:appcompat-v7:26.1.0' implementation 'com.android.support.constraint:constraint-layout:1.0.2' testImplementation 'junit:junit:4.12' androidTestImplementation 'com.android.support.test:runner:1.0.1' androidTestImplementation 'com.android.support.test.espresso:espresso-core:3.0.1' compile 'com.android.support:design:26.1.0' } |
colors.xml, strings.xml ve styles.xml dosyamızı aşağıdaki gibi düzenliyoruz.
colors.xml
|
1 2 3 4 5 6 7 8 |
<?xml version="1.0" encoding="utf-8"?> <resources> <color name="colorPrimary">#3F51B5</color> <color name="colorPrimaryDark">#303F9F</color> <color name="colorAccent">#FF4081</color> <color name="red">#f00</color> <color name="white">#fff</color> </resources> |
strings.xml
|
1 2 3 4 5 |
<resources> <string name="app_name">SlidingNavigationDrawerYapimi</string> <string name="drawer_open">Open</string> <string name="drawer_close">Close</string> </resources> |
styles.xml
|
1 2 3 4 5 6 7 8 9 10 11 12 13 14 15 16 17 18 19 20 |
<resources> <!-- Base application theme. --> <style name="AppTheme" parent="Theme.AppCompat.Light.NoActionBar"> <!-- Customize your theme here. --> <item name="colorPrimary">@color/colorPrimary</item> <item name="colorPrimaryDark">@color/colorPrimaryDark</item> <item name="colorAccent">@color/colorAccent</item> </style> <style name="AppTheme.NoActionBar"> <item name="windowActionBar">false</item> <item name="windowNoTitle">true</item> </style> <style name="AppTheme.AppBarOverlay" parent="ThemeOverlay.AppCompat.Dark.ActionBar" /> <style name="AppTheme.PopupOverlay" parent="ThemeOverlay.AppCompat.Light" /> </resources> |
Bu ayarlamalarımız yaptıktan sonra geriye uygulamada kullanacağımız iconları projemize dahil etmek kalıyor. Buraya tıklayarak indiriyoruz SlidingNavigationDrawerİcon dosyasının içindekilerini res klasörünün altına atıyoruz.
Alt tarafta bulunan itemleri tanımlayamak için res klasörünün altına bir menu dosyası oluşturuyoruz. menu dosyasının altına da menu_navigation.xml dosyası oluşturuyoruz ve aşağıdaki gibi düzenliyoruz.
menu_navigation.xml
|
1 2 3 4 5 6 7 8 9 10 11 12 13 14 15 16 17 18 19 20 21 22 23 24 25 26 27 |
<?xml version="1.0" encoding="utf-8"?> <menu xmlns:android="http://schemas.android.com/apk/res/android" xmlns:app="http://schemas.android.com/apk/res-auto"> <group android:checkableBehavior="single"> <item android:id="@+id/home" android:title="Home" android:icon="@drawable/ic_home" /> <item android:id="@+id/settings" android:title="Settings" android:icon="@drawable/ic_setting" /> <item android:id="@+id/trash" android:title="Trash" android:icon="@drawable/ic_trash" android:iconTint="@color/red" /> <item android:id="@+id/logout" android:title="Logout" android:icon="@drawable/ic_exit" /> </group> </menu> |
activity_main.xml dosyamız Sliding Navigation’da kullanılan butonları görüntülemek için kullanılan content_main.xml dosyası ile bağlantılıdır. activity_main.xml ve content_main.xml dosyamızı aşağıdaki gibi düzenliyoruz.
activity_main.xml
|
1 2 3 4 5 6 7 8 9 10 11 12 13 14 15 16 17 18 19 20 21 22 23 24 25 26 27 28 29 30 31 32 33 34 35 36 37 38 39 40 41 42 43 44 45 46 47 48 |
<?xml version="1.0" encoding="utf-8"?> <android.support.v4.widget.DrawerLayout xmlns:android="http://schemas.android.com/apk/res/android" xmlns:app="http://schemas.android.com/apk/res-auto" xmlns:tools="http://schemas.android.com/tools" android:id="@+id/drawer" android:layout_width="match_parent" android:layout_height="match_parent" android:fitsSystemWindows="true" tools:openDrawer="start"> <android.support.design.widget.CoordinatorLayout android:layout_width="match_parent" android:layout_height="match_parent" android:fitsSystemWindows="true" tools:context="com.example.esatgozcu.slidingnavigationdraweryapimi.MainActivity"> <android.support.design.widget.AppBarLayout android:layout_width="match_parent" android:layout_height="wrap_content" android:theme="@style/AppTheme.AppBarOverlay"> <android.support.v7.widget.Toolbar android:id="@+id/toolbar" android:layout_width="match_parent" android:layout_height="?attr/actionBarSize" android:background="@color/red" app:title="Gmail" app:titleTextColor="@color/white" app:popupTheme="@style/AppTheme.PopupOverlay" /> </android.support.design.widget.AppBarLayout> <include layout="@layout/content_main" /> </android.support.design.widget.CoordinatorLayout> <android.support.design.widget.NavigationView android:id="@+id/navigation_view" android:layout_height="match_parent" android:layout_width="wrap_content" android:layout_gravity="start" app:headerLayout="@layout/nav_header" app:menu="@menu/menu_navigation" app:itemIconTint="@color/red" app:itemBackground="@color/white"/> </android.support.v4.widget.DrawerLayout> |
content_main.xml
|
1 2 3 4 5 6 7 8 9 10 11 12 13 14 15 16 17 18 |
<?xml version="1.0" encoding="utf-8"?> <RelativeLayout xmlns:android="http://schemas.android.com/apk/res/android" xmlns:app="http://schemas.android.com/apk/res-auto" xmlns:tools="http://schemas.android.com/tools" android:layout_width="match_parent" android:layout_height="match_parent" app:layout_behavior="@string/appbar_scrolling_view_behavior" tools:context="com.example.esatgozcu.slidingnavigationdraweryapimi.MainActivity" tools:showIn="@layout/activity_main"> <TextView android:layout_width="wrap_content" android:layout_height="wrap_content" android:layout_centerHorizontal="true" android:layout_centerVertical="true" android:textSize="24sp" android:text="Navigation Drawer" /> </RelativeLayout> |
Son xml dosyamız olan nav_header.xml mail adresimizi ve mail avatarının gözükeceği üst kısmı düzenlemektedir. nav_header.xml dosyamızı aşağıdaki gibi düzenliyoruz.
|
1 2 3 4 5 6 7 8 9 10 11 12 13 14 15 16 17 18 19 20 21 22 23 24 |
<?xml version="1.0" encoding="utf-8"?> <LinearLayout xmlns:android="http://schemas.android.com/apk/res/android" android:orientation="vertical" android:paddingTop="20dp" android:paddingBottom="20dp" android:background="@color/red" android:layout_width="match_parent" android:layout_height="190dp"> <ImageView android:layout_width="wrap_content" android:layout_height="0dp" android:layout_gravity="center" android:layout_weight="1" android:src="@drawable/ic_person" /> <TextView android:id="@+id/tv_email" android:textColor="@color/white" android:textSize="18sp" android:layout_gravity="center" android:layout_width="wrap_content" android:layout_height="wrap_content" /> </LinearLayout> |
Xml dosyalarımızı oluşturduktan sonra geriye bunları birbirleri ve java sınıfın ile bağlamak kalıyoruz. MainActivity.java sınıfımızıda aşağıdaki gibi düzenliyoruz.
|
1 2 3 4 5 6 7 8 9 10 11 12 13 14 15 16 17 18 19 20 21 22 23 24 25 26 27 28 29 30 31 32 33 34 35 36 37 38 39 40 41 42 43 44 45 46 47 48 49 50 51 52 53 54 55 56 57 58 59 60 61 62 63 64 65 66 67 68 69 70 71 72 73 74 75 76 77 |
package com.example.esatgozcu.slidingnavigationdraweryapimi; import android.os.Bundle; import android.support.design.widget.NavigationView; import android.support.v4.widget.DrawerLayout; import android.support.v7.app.ActionBarDrawerToggle; import android.support.v7.app.AppCompatActivity; import android.support.v7.widget.Toolbar; import android.view.View; import android.view.MenuItem; import android.widget.TextView; import android.widget.Toast; public class MainActivity extends AppCompatActivity { private DrawerLayout drawerLayout; private Toolbar toolbar; @Override protected void onCreate(Bundle savedInstanceState) { super.onCreate(savedInstanceState); setContentView(R.layout.activity_main); toolbar = (Toolbar) findViewById(R.id.toolbar); setSupportActionBar(toolbar); initNavigationDrawer(); } public void initNavigationDrawer() { NavigationView navigationView = (NavigationView)findViewById(R.id.navigation_view); navigationView.setNavigationItemSelectedListener(new NavigationView.OnNavigationItemSelectedListener() { @Override public boolean onNavigationItemSelected(MenuItem menuItem) { int id = menuItem.getItemId(); switch (id){ case R.id.home: Toast.makeText(getApplicationContext(),"Home",Toast.LENGTH_SHORT).show(); drawerLayout.closeDrawers(); break; case R.id.settings: Toast.makeText(getApplicationContext(),"Settings",Toast.LENGTH_SHORT).show(); break; case R.id.trash: Toast.makeText(getApplicationContext(),"Trash",Toast.LENGTH_SHORT).show(); drawerLayout.closeDrawers(); break; case R.id.logout: finish(); } return true; } }); View header = navigationView.getHeaderView(0); TextView tv_email = (TextView)header.findViewById(R.id.tv_email); tv_email.setText("esatgozcu@gmail.com"); drawerLayout = (DrawerLayout)findViewById(R.id.drawer); ActionBarDrawerToggle actionBarDrawerToggle = new ActionBarDrawerToggle(this,drawerLayout,toolbar,R.string.drawer_open,R.string.drawer_close){ @Override public void onDrawerClosed(View v){ super.onDrawerClosed(v); } @Override public void onDrawerOpened(View v) { super.onDrawerOpened(v); } }; drawerLayout.addDrawerListener(actionBarDrawerToggle); actionBarDrawerToggle.syncState(); } } |
Böylelikle Sliding Navigation Drawer kullanımının nasıl olduğunu öğrenmiş olduk bundan sonra sizde uygulamalarınızı navigasyon ekleyerek zenginleştirebilirsiniz. Projenin kaynak kodlarının buraya tıklayarak indirebilirsiniz.