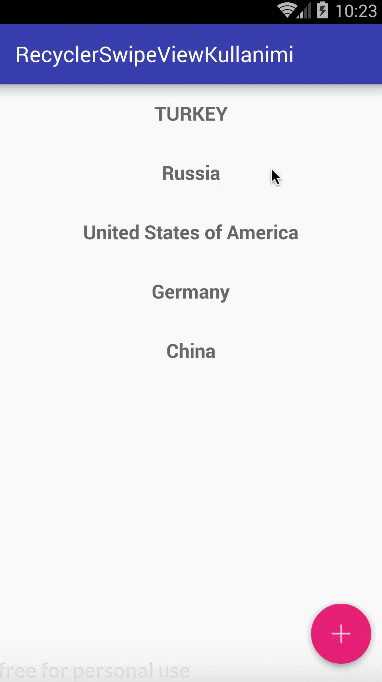
Android Studio RecyclerView ile Swipe Kullanımı

Gün içinde neredeyse hepimiz Gmail gelen kutumuzu kontrol ederiz ve istemediğimiz postaları sağ veya sola sürükleyerek istediğimiz postayı arşivleyebiliyoruz ayrıca sağ altta bulunan FloatingAction butona tıkladığımızda da istediğimiz kişilere kolay bir yoldan e-posta atabiliyoruz. Bu makalede de bu işlemleri nasıl yapabileceğimize bakacağız.
Anlatıma geçmeden önce bir kaç tane eklenmesi gerekenler var öncelikle build.gradle dosyamıza RecyclerView kullanabilmemiz için aşağıdaki satırı ekliyoruz.
|
1 |
compile 'com.android.support:design:26.1.0' |
Sizde sürüm numarası hata verebilir kendi sürümünüze göre değiştirebilirsiniz. Daha sonra buraya tıklayarak indirdiğiniz üç resmi drawable klasörünün altına ekleyin. Gerekli eklemeleri yaptık artık anlatıma geçebiliriz.
Öncelikle yeni proje oluşturuyoruz ve aşağıdaki kodlara göre düzenliyoruz.
activity_main.xml
|
1 2 3 4 5 6 7 8 9 10 11 12 13 14 15 16 17 18 19 20 21 22 23 |
<?xml version="1.0" encoding="utf-8"?> <android.widget.RelativeLayout xmlns:android="http://schemas.android.com/apk/res/android" xmlns:tools="http://schemas.android.com/tools" android:layout_width="match_parent" android:layout_height="match_parent" android:fitsSystemWindows="true" tools:context="com.example.esatgozcu.recyclerswipeviewkullanimi.MainActivity"> <android.support.v7.widget.RecyclerView android:id="@+id/card_recycler_view" android:layout_width="match_parent" android:layout_height="match_parent" /> <android.support.design.widget.FloatingActionButton android:id="@+id/fab" android:layout_width="wrap_content" android:layout_height="wrap_content" android:layout_alignParentBottom="true" android:layout_alignParentEnd="true" android:layout_alignParentRight="true" android:src="@drawable/ic_add" /> </android.widget.RelativeLayout> |
RecyclerView’deki Item’ları swipe işlemini yapmak için ItemTouchHelper.SimpleCallback sınıfını kullanıyoruz.Bu sınıfta otomatik olarak iki tane override methodu kullanmamız gerekiyor.
onSwiped() :Kaydırma işleminden sonra ne olacağınız belirliyoruz.
onChildDraw() : Kaydırma işlemi gerçekleşirken arka plan rengini ne olacağını ve hangi iconu alacağını belirliyoruz.
MainActivity.java
|
1 2 3 4 5 6 7 8 9 10 11 12 13 14 15 16 17 18 19 20 21 22 23 24 25 26 27 28 29 30 31 32 33 34 35 36 37 38 39 40 41 42 43 44 45 46 47 48 49 50 51 52 53 54 55 56 57 58 59 60 61 62 63 64 65 66 67 68 69 70 71 72 73 74 75 76 77 78 79 80 81 82 83 84 85 86 87 88 89 90 91 92 93 94 95 96 97 98 99 100 101 102 103 104 105 106 107 108 109 110 111 112 113 114 115 116 117 118 119 120 121 122 123 124 125 126 127 128 129 130 131 132 133 134 135 136 137 138 139 140 141 142 143 144 145 146 147 148 149 150 151 152 153 154 155 156 157 158 159 160 161 162 163 164 165 166 167 168 169 170 171 172 173 174 175 176 177 178 179 180 181 182 183 184 185 186 187 188 189 190 |
package com.example.esatgozcu.recyclerswipeviewkullanimi; import android.content.DialogInterface; import android.graphics.Bitmap; import android.graphics.BitmapFactory; import android.graphics.Canvas; import android.graphics.Color; import android.graphics.Paint; import android.graphics.RectF; import android.os.Bundle; import android.support.design.widget.FloatingActionButton; import android.support.v7.app.AlertDialog; import android.support.v7.app.AppCompatActivity; import android.support.v7.widget.LinearLayoutManager; import android.support.v7.widget.RecyclerView; import android.support.v7.widget.helper.ItemTouchHelper; import android.view.View; import android.view.ViewGroup; import android.widget.EditText; import java.util.ArrayList; public class MainActivity extends AppCompatActivity implements View.OnClickListener{ private ArrayList<String> countries = new ArrayList<>(); private DataAdapter adapter; private RecyclerView recyclerView; private AlertDialog.Builder alertDialog; private EditText et_country; private int edit_position; private View view; private boolean add = false; private Paint p = new Paint(); @Override protected void onCreate(Bundle savedInstanceState) { super.onCreate(savedInstanceState); setContentView(R.layout.activity_main); initViews(); initDialog(); } private void initViews(){ //FloatingActionButton tanımlanıyor FloatingActionButton fab = (FloatingActionButton) findViewById(R.id.fab); fab.setOnClickListener(this); //RecyclerView tanımlanıyor recyclerView = (RecyclerView)findViewById(R.id.card_recycler_view); //Eğer Recyclerview’in boyutunu değiştirmeyecekseniz performansı arttırmak için boyutunu sabitleyebilirsiniz recyclerView.setHasFixedSize(true); RecyclerView.LayoutManager layoutManager = new LinearLayoutManager(getApplicationContext()); recyclerView.setLayoutManager(layoutManager); //ArrayList adaptere atanıyor adapter = new DataAdapter(countries); //adapter recyclerView'e atanıyor recyclerView.setAdapter(adapter); //Verileri Ekliyoruz countries.add("TURKEY"); countries.add("Russia"); countries.add("United States of America"); countries.add("Germany"); countries.add("China"); //Adaptore verinin değiştiğini bildirmek için notifyDataSetChanged methodunu kullanıyoruz. adapter.notifyDataSetChanged(); initSwipe(); } private void initSwipe(){ ItemTouchHelper.SimpleCallback simpleItemTouchCallback = new ItemTouchHelper.SimpleCallback(0, ItemTouchHelper.LEFT | ItemTouchHelper.RIGHT) { @Override public boolean onMove(RecyclerView recyclerView, RecyclerView.ViewHolder viewHolder, RecyclerView.ViewHolder target) { return false; } //Listedeki Item'ları kaydırdığımız zaman hangi işlem gerçekleşecek ise onSwiped methodunda uyguluyoruz @Override public void onSwiped(RecyclerView.ViewHolder viewHolder, int direction) { //Hangi Item kaydırıldıysa position değişkenine Adapterdeki değeri atanıyor. int position = viewHolder.getAdapterPosition(); //Eğer sola kaydırırsak if (direction == ItemTouchHelper.LEFT) { //adapterden position değişkenine atanmış değeri kaldırıyoruz adapter.removeItem(position); } else { //Eğer sağa kaydırırsak removeView(); edit_position = position; alertDialog.setTitle("Edit Country"); et_country.setText(countries.get(position)); alertDialog.show(); } } //Listedeki Item'ları kaydırdığımız zaman arka planın rengini ve hangi iconu alacağınıda onChildDraw() methodunda belirtiyoruz //Çizeceğimiz dikdörgenin koordinatlarını getTop(),getBottom(),getRight(),getLeft() methodların ile elde ediyoruz @Override public void onChildDraw(Canvas c, RecyclerView recyclerView, RecyclerView.ViewHolder viewHolder, float dX, float dY, int actionState, boolean isCurrentlyActive) { Bitmap icon; if(actionState == ItemTouchHelper.ACTION_STATE_SWIPE){ View itemView = viewHolder.itemView; float height = (float) itemView.getBottom() - (float) itemView.getTop(); float width = height / 3; if(dX > 0){ //Sağa kaydırılmış ise arka planı ayarlıyoruz p.setColor(Color.parseColor("#388E3C")); RectF background = new RectF((float) itemView.getLeft(), (float) itemView.getTop(), dX,(float) itemView.getBottom()); c.drawRect(background,p); icon = BitmapFactory.decodeResource(getResources(), R.drawable.ic_edit_white); RectF icon_dest = new RectF((float) itemView.getLeft() + width ,(float) itemView.getTop() + width,(float) itemView.getLeft()+ 2*width,(float)itemView.getBottom() - width); c.drawBitmap(icon,null,icon_dest,p); } else { //Sola kaydırılmış ise arka planı ayarlıyoruz //Dikdörtgenin rengini ayarılıyoruz p.setColor(Color.parseColor("#D32F2F")); //Dikdörgenin Koordinatalarını ayarlıyoruz RectF background = new RectF((float) itemView.getRight() + dX, (float) itemView.getTop(),(float) itemView.getRight(), (float) itemView.getBottom()); //Dikdörgeni çiziyoruz c.drawRect(background,p); //iconu ayarlıyoruz icon = BitmapFactory.decodeResource(getResources(), R.drawable.ic_delete_white); //iconun yerini ayarlıyoruz RectF icon_dest = new RectF((float) itemView.getRight() - 2*width ,(float) itemView.getTop() + width,(float) itemView.getRight() - width,(float)itemView.getBottom() - width); //iconu çizdiriyoruz c.drawBitmap(icon,null,icon_dest,p); } } super.onChildDraw(c, recyclerView, viewHolder, dX, dY, actionState, isCurrentlyActive); } }; ItemTouchHelper itemTouchHelper = new ItemTouchHelper(simpleItemTouchCallback); itemTouchHelper.attachToRecyclerView(recyclerView); } private void removeView(){ if(view.getParent()!=null) { ((ViewGroup) view.getParent()).removeView(view); } } private void initDialog(){ //RecyclerView'deki Item'ları sağ sürüklediğimde ekleme yapacağımızda karşımıza çıkacak AlertDialog penceresini düzenliyoruz alertDialog = new AlertDialog.Builder(this); view = getLayoutInflater().inflate(R.layout.dialog_layout,null); alertDialog.setView(view); alertDialog.setPositiveButton("Save", new DialogInterface.OnClickListener() { @Override public void onClick(DialogInterface dialog, int which) { //Eğer add değişkeni true olduysa yani float butona tıkladığımızda veya sağ sürükleme yaptığımızda //if bloğu çalışacak if(add){ //Save tuşuna basılırsa.. add =false; adapter.addItem(et_country.getText().toString()); dialog.dismiss(); } else { countries.set(edit_position,et_country.getText().toString()); adapter.notifyDataSetChanged(); dialog.dismiss(); } } }); et_country = (EditText)view.findViewById(R.id.et_country); } @Override public void onClick(View v) { //FloatAction Butona Tıklandığında.. switch (v.getId()){ case R.id.fab: removeView(); add = true; alertDialog.setTitle("Add Country"); et_country.setText(""); alertDialog.show(); break; } } } |
RecyclerView’de ülkeleri görüntülemek için bir tane layout oluşturuyoruz. Bir tane Textview sürükleyip bırakıyoruz.
row_layout.xml
|
1 2 3 4 5 6 7 8 9 10 11 12 13 14 15 16 17 18 |
<?xml version="1.0" encoding="utf-8"?> <LinearLayout xmlns:android="http://schemas.android.com/apk/res/android" android:orientation="vertical" android:layout_marginBottom="1dp" android:layout_width="match_parent" android:layout_height="wrap_content"> <TextView android:id="@+id/tv_country" android:layout_marginTop="15dp" android:layout_marginBottom="15dp" android:layout_gravity="center" android:textSize="18sp" android:layout_width="wrap_content" android:layout_height="wrap_content" android:textStyle="bold" /> </LinearLayout> |
AlertDialog açıldığı zaman yazı yazmak için kullanacağımız EditText için layout oluşturuyoruz. Bir tane EditText sürükleyip bırakıyoruz.
dialog_layout.xml
|
1 2 3 4 5 6 7 8 9 10 11 12 13 14 15 |
<?xml version="1.0" encoding="utf-8"?> <LinearLayout xmlns:android="http://schemas.android.com/apk/res/android" android:orientation="vertical" android:layout_width="match_parent" android:layout_height="match_parent"> <EditText android:id="@+id/et_country" android:layout_marginLeft="10dp" android:layout_marginRight="10dp" android:layout_marginTop="10dp" android:layout_marginBottom="10dp" android:layout_width="match_parent" android:layout_height="wrap_content" /> </LinearLayout> |
Son olarak RecyclerView kullanabilmek için DataAdapter oluşturuyoruz.
DataAdapter.java
|
1 2 3 4 5 6 7 8 9 10 11 12 13 14 15 16 17 18 19 20 21 22 23 24 25 26 27 28 29 30 31 32 33 34 35 36 37 38 39 40 41 42 43 44 45 46 47 48 49 50 51 52 53 |
package com.example.esatgozcu.recyclerswipeviewkullanimi; import android.support.v7.widget.RecyclerView; import android.view.LayoutInflater; import android.view.View; import android.view.ViewGroup; import android.widget.TextView; import java.util.ArrayList; public class DataAdapter extends RecyclerView.Adapter<DataAdapter.ViewHolder> { private ArrayList<String> countries; public DataAdapter(ArrayList<String> countries) { this.countries = countries; } @Override public DataAdapter.ViewHolder onCreateViewHolder(ViewGroup viewGroup, int i) { View view = LayoutInflater.from(viewGroup.getContext()).inflate(R.layout.row_layout, viewGroup, false); return new ViewHolder(view); } @Override public void onBindViewHolder(ViewHolder viewHolder, int i) { viewHolder.tv_country.setText(countries.get(i)); } @Override public int getItemCount() { return countries.size(); } public void addItem(String country) { countries.add(country); notifyItemInserted(countries.size()); } public void removeItem(int position) { countries.remove(position); notifyItemRemoved(position); notifyItemRangeChanged(position, countries.size()); } public class ViewHolder extends RecyclerView.ViewHolder{ TextView tv_country; public ViewHolder(View view) { super(view); tv_country = (TextView)view.findViewById(R.id.tv_country); } } } |
Böylelikle RecyclerView ile birlikte Swipe nasıl kullanacağımızı anlatmaya çalıştım.Projenin kaynak kodlarını indirip kodlarda değişiklik yaparak denemeler yapın daha iyi konuyu anlamanıza yardımcı olacaktır.
Projenin kaynak kodlarını buraya tıklayarak indirebilirsiniz.